
Unlock Faster Internet: How to Optimize Your Olleh Router’s Speed and Duplex Settings!
Unlock Faster Internet: How to Optimize Your Olleh Router’s Speed and Duplex Settings!
Hello from Semicolon;!
Have you ever experienced frustratingly slow internet while using your Olleh router? Are you a KT Olleh router user who’s encountered sluggish or unstable network performance? Often, these issues stem from sub-optimal port configurations on your router. In this post, we’ll guide you through accessing your Olleh router’s admin page to check your network speed, change to Full Duplex mode, and delve into the frequently asked-about Pause settings.
How to Access Your Olleh Router’s Admin Page
Default Access Addresses
Connecting to your KT Olleh router’s admin page is straightforward. Simply open a web browser (Chrome, Edge, Safari, etc.) and enter one of the following addresses into the URL bar:
-
http://172.30.1.254 (Direct IP address access)
http://homehub.olleh.com (Domain access)
http://homehub.kt.com (Alternative domain)
Among these, directly entering the IP address 172.30.1.254 is the most reliable method, as domain addresses can sometimes fail to resolve due to DNS settings.
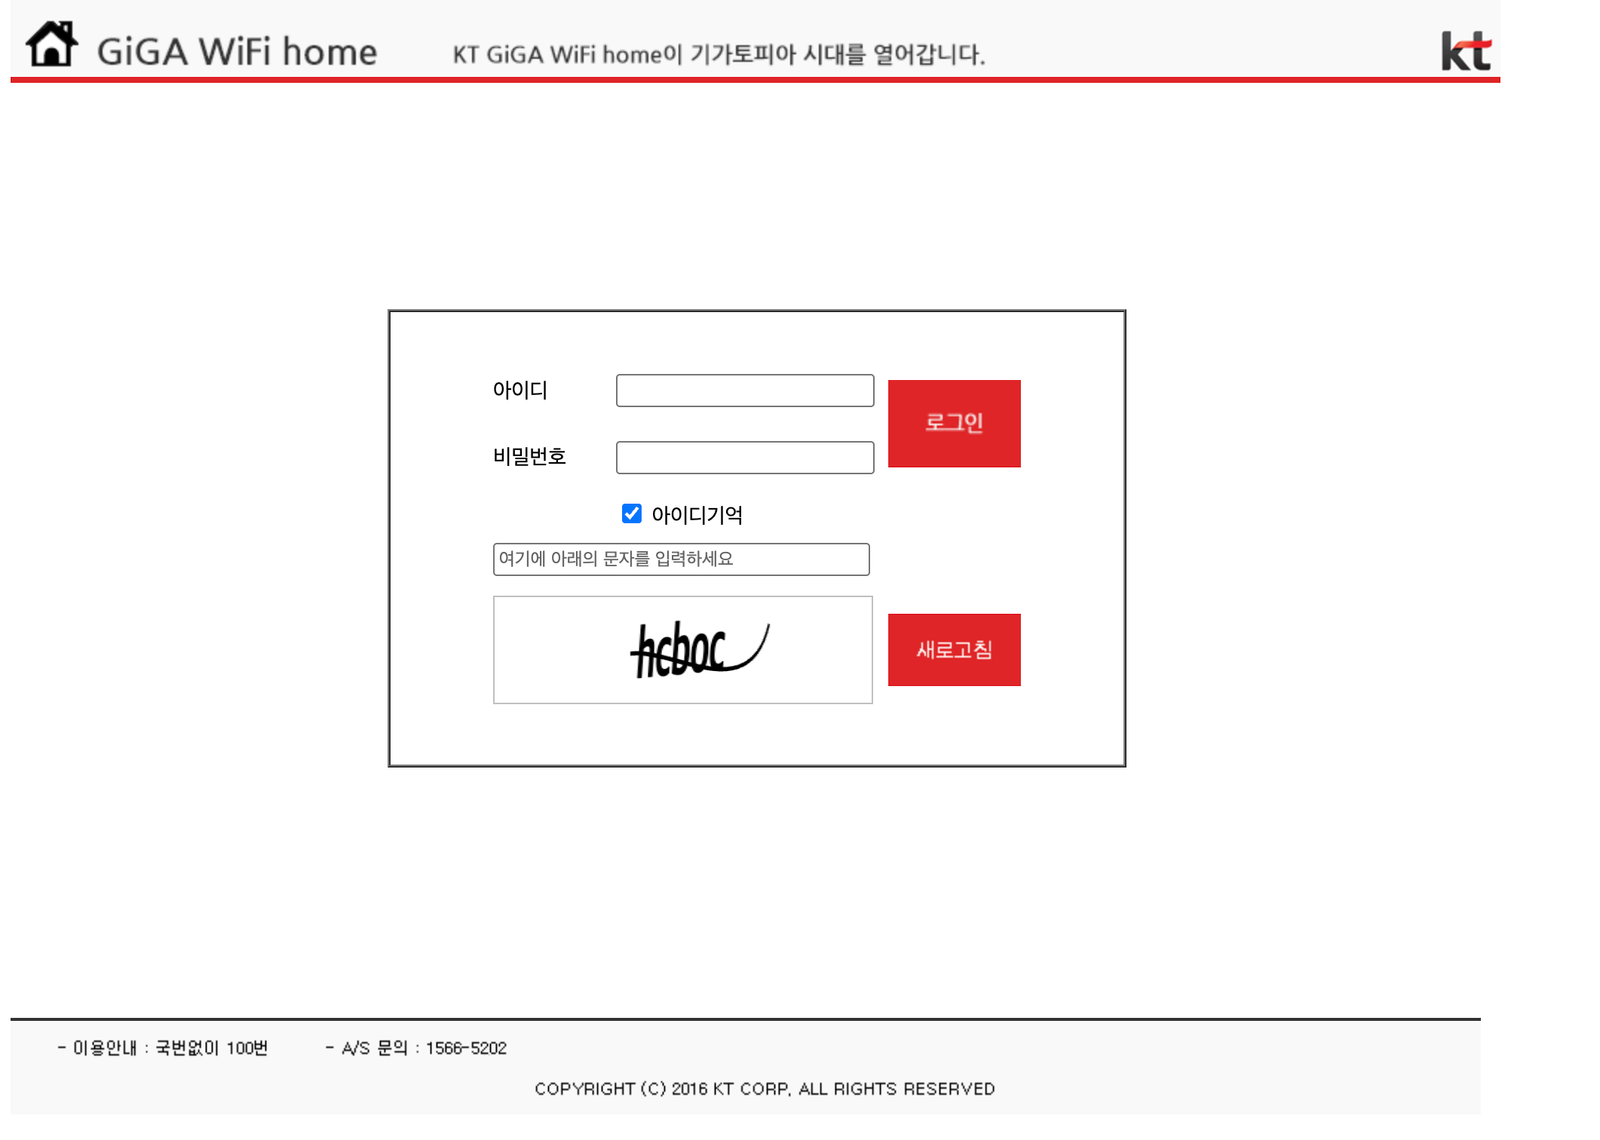
Login Information
Once you access the admin page, a login screen will appear. The default login credentials for KT Olleh routers are typically:
-
ID: ktuser
-
Password: homehub or 12345678
If these passwords don’t work, it’s likely that the password was changed previously. If you can’t recall it, you can perform a factory reset by pressing the small reset button on the back of the router for 3 seconds or more.
Troubleshooting Connection Issues
If you’re unable to access the admin page, check the following:
-
Direct Router Connection: Ensure your LAN cable is connected directly to the KT router (the device with wireless antennas), not the modem.
-
Verify Default Gateway: For Windows users, open Command Prompt (CMD) and run the `ipconfig` command. Confirm that your default gateway is 172.30.1.254.
-
Repeater Usage: If you’re using another router (e.g., an ipTIME router) as a repeater, you can only access the KT router’s admin page from a device directly connected to the KT router itself.
Navigating to Switch Management in Device Settings
Once you’ve successfully logged into the admin page, it’s time to optimize your network speed.
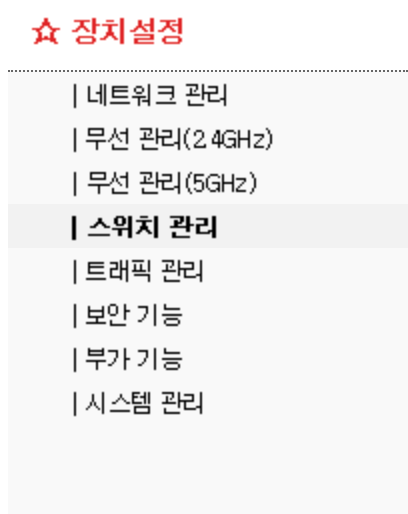
Finding the Switch Management Menu
-
After logging in, click on “장치 설정 (Device Settings)” in the left-hand menu.
-
Under the “Device Settings” submenu, select “스위치 관리 (Switch Management)“.
-
The Switch Management page will open, displaying various configuration options.
The Switch Management menu is a core feature that controls the physical ports of your network device. Here, you can configure each port’s speed, communication mode (Duplex), and flow control (Pause).
Optimizing Speed with Port Link Settings
Accessing the Port Link Settings Page
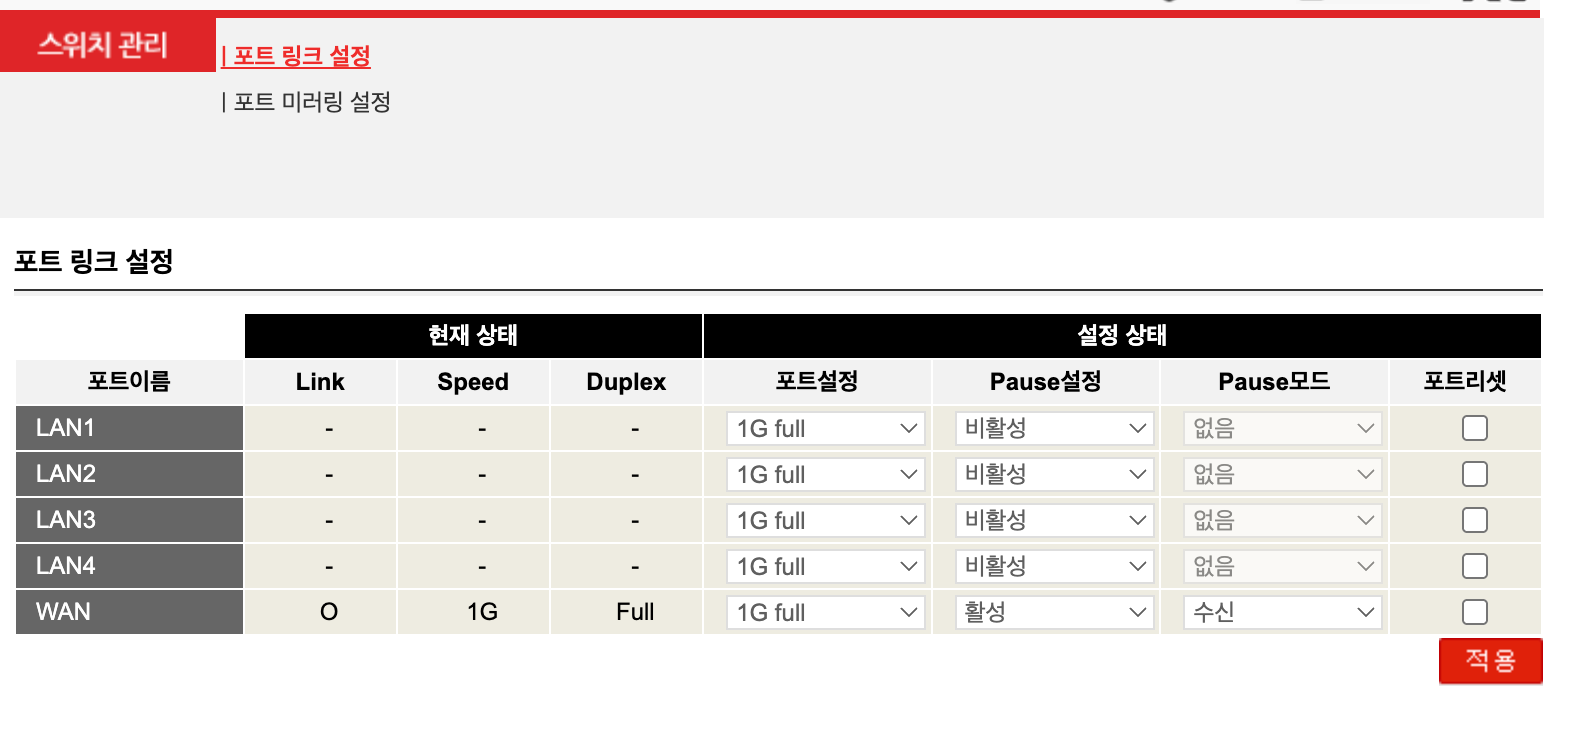
Clicking “포트 링크 설정 (Port Link Settings)” within the Switch Management menu will bring up a detailed network configuration screen for each port. On this screen, you can check information such as:
-
WAN Port (Internet line connection port)
-
LAN Ports 1-4 (Ports for connecting computers, TVs, NAS, etc.)
-
Current speed and Duplex mode for each port
-
Connection status for each port (Link Up/Down)
-
MAC address information
Setting WAN and LAN Port Speeds to Full Duplex
To maximize your network performance, you should set the speed of your active WAN and LAN ports to Full Duplex. This process involves the following steps:
-
Identify Active Ports: On the Port Link Settings screen, check for ports displaying a “Link Up” status.
-
Change Speed Setting: Click on the speed setting for the relevant port and change it as follows:
-
Auto → 1000 Full (for Gigabit Ethernet connections)
-
Auto → 100 Full (for Fast Ethernet connections)
-
-
Save Settings: Save and apply your changes.
Understanding Speed and Duplex
The two most crucial parameters in network port settings are Speed and Duplex:
Speed (Rate Setting)
-
10 Mbps: 10BASE-T Ethernet (older standard)
-
100 Mbps: Fast Ethernet (common wired internet)
-
1000 Mbps (1 Gbps): Gigabit Ethernet (high-speed wired internet)
-
Auto: Automatically negotiates the optimal speed with the connected device.
Duplex (Communication Mode)
-
Full Duplex: Full-duplex communication allows simultaneous sending and receiving of data.
-
Half Duplex: Half-duplex communication sends and receives data alternately.
-
Auto: Automatically negotiates the mode with the connected device.
Auto Setting vs. Manual Full Duplex
While “Auto” setting generally allows both devices to automatically negotiate the optimal speed and duplex mode, manually setting Full Duplex can be more effective in certain situations:
-
When network speed is inexplicably slow.
-
When frequent packet loss or retransmissions occur.
-
When “Duplex Mismatch” errors happen (e.g., one side negotiates Full, the other Half).
-
When you desire maximum performance in a fixed network environment.
We particularly recommend setting devices that handle large amounts of data, such as NAS drives, game consoles, and IPTV set-top boxes, to 1000 Full Duplex.
How to Verify After Setting
After changing port speeds, you can verify proper operation as follows:
-
Check Admin Page: Confirm that each port’s status on the Port Link Settings screen shows “1000 Full” or “100 Full”.
-
Check in Windows: Verify the “Link Speed” in your network adapter properties.
-
Perform Speed Test: Confirm performance improvement through actual file transfers or internet speed tests.
Understanding Pause Settings
What is the Pause Function?
The Pause function is a mechanism for network flow control. It enables a receiving device to send a signal to a transmitting device, requesting it to “temporarily stop data transmission.”
Specifically, network devices have a receive buffer that temporarily stores incoming data. If data arrives too quickly and fills up this buffer, the device can no longer receive data, leading to packet loss. The Pause function prevents this by requesting the sender to pause temporarily.
How the Pause Signal Works
The Pause mechanism operates as follows:
-
Receive Buffer Monitoring: The receiving device continuously monitors its buffer status.
-
Threshold Reached: When the buffer reaches a certain threshold (e.g., 80%), a Pause signal is transmitted.
-
Transmission Temporarily Halted: The transmitting device, upon receiving the Pause signal, ceases data transmission for a specified duration.
-
Transmission Resumes: Data transmission restarts once the pause duration ends or the receiving device sends a resume signal.
This process helps maintain stable communication without data loss.
Types of Pause Modes
The Pause modes configurable on network devices generally include:
1. Pause Transmit (Tx Pause)
-
Enables the device to send a Pause signal to the other party when its own buffer is full.
-
Important when the device acts as a receiver.
2. Pause Receive (Rx Pause)
-
Enables the device to receive and process Pause signals sent by the other party.
-
Important when the device acts as a transmitter.
3. Pause Bi-directional (Both Tx/Rx Pause Enabled)
-
Uses Pause functionality for both sending and receiving.
-
Most common setting in Full Duplex environments.
4. Pause Disabled (No Pause)
-
Does not use the Pause function at all.
-
Recommended only in very stable network environments.
LAN Side Pause Function
The “LAN 측 Pause 기능 (LAN Side Pause Function)” found in the Olleh router’s Switch Management determines whether Pause signals are transmitted between LAN ports.
When LAN Side Pause Function is ON:
-
A Pause signal generated on one LAN port will be transmitted to other LAN ports as well.
-
Example: If a NAS connected to LAN1 sends a Pause signal, devices connected to LAN2, LAN3, and LAN4 will also receive this signal.
When LAN Side Pause Function is OFF:
-
Pause signals are not transmitted between LAN ports (they are filtered).
-
Each LAN port operates independently.
Pause Setting Recommendations
It’s advisable to configure Pause settings differently depending on your actual usage environment:
When to Enable Pause (ON):
-
If you frequently transfer large files (e.g., to/from NAS, file servers).
-
If there’s a significant performance difference among connected network devices.
-
In unstable environments with frequent packet loss.
-
If you use IPTV or streaming services.
When to Disable Pause (OFF):
-
For applications where low latency is critical, such as online gaming.
-
In stable network environments with low traffic.
-
If all connected devices are modern, high-performance equipment.
For typical home environments, keeping the Pause function enabled (ON) generally leads to more stable performance.
Precautions When Changing Settings
Duplex Mismatch Issue
The most critical point to watch out for when manually configuring port speeds is Duplex Mismatch. This issue occurs when the Duplex settings of two connected devices differ:
-
Router: Set to Full Duplex
-
Connected PC: Negotiates Half Duplex
When this situation arises, you’ll encounter problems such as:
-
Significantly reduced network speed (often 10-30% of theoretical speed).
-
Frequent packet collisions and retransmissions.
-
Unstable connection.
Backup Before Changing Settings
Before making any significant network configuration changes, always make a note or take screenshots of your current settings. This way, if any issues arise after the changes, you can revert to the original configuration.
Necessity of Rebooting
Some settings require a router reboot to take full effect. If your changes don’t seem to apply, try performing a “System Restart” from the admin page.
Network Performance Optimization Tips
Check Cable Quality
Even with perfect router settings, poor quality LAN cables can degrade performance. To fully utilize gigabit speeds, ensure you’re using Cat 5e or higher cables:
-
Cat 5e: Supports up to 1 Gbps (sufficient for most home users).
-
Cat 6: Supports up to 10 Gbps (within 55m).
-
Cat 6a: Supports up to 10 Gbps (within 100m).
Regular Firmware Updates
KT regularly updates the firmware for Olleh routers to improve security and performance. It’s recommended to keep your router updated to the latest version via “System Management” → “Firmware Update” on the admin page.
Disconnect Unnecessary Devices
Connecting too many devices to your router can spread out network bandwidth, leading to slower overall speeds. It’s good practice to disconnect unused devices from Wi-Fi or LAN connections.
Troubleshooting Guide
If Speed is Still Slow
If your speed remains slow even after changing port settings to Full Duplex, check the following:
-
Line Issue Itself: Contact KT Customer Service (dial 100) and request a line quality inspection.
-
Modem Status Check: Ensure the LOS (Loss of Signal) light on your optical modem is not illuminated.
-
Router Overheating: If your router is too hot, its performance can degrade. Place it in a well-ventilated area.
If No Internet After Changing Settings
If your internet connection drops after making changes:
-
Reboot Router: Unplug the power, wait 30 seconds, then plug it back in.
-
Factory Reset: Press and hold the reset button on the back of the router for 10 seconds or more to perform a factory reset.
-
Revert to Auto: Try changing the port settings back to “Auto.”
If Only Specific Ports Are Not Working
If you’re experiencing issues with only a particular LAN port:
-
Test with Another Port: Connect the cable to a different LAN port to see if it works correctly.
-
Replace Cable: Try replacing the LAN cable with another one.
-
Hardware Defect: If the above steps don’t resolve the issue, it might be a router hardware defect. Contact KT to request a replacement.
Additional Information for Advanced Users
Relationship with VLAN Settings
Some Olleh router models also offer VLAN (Virtual LAN) settings. If you use VLANs, you might be able to configure port speed and Pause settings differently for each VLAN.
Difference Between QoS and Pause
QoS (Quality of Service) is a feature for prioritizing network traffic, while Pause is a flow control mechanism that prevents buffer overflow. They serve different purposes and can be used together to build a more stable network.
Considering Jumbo Frames
In specialized network environments, Jumbo Frames (frames up to 9000 bytes instead of the standard 1500 bytes) are sometimes used. However, all devices must support Jumbo Frames, and Olleh consumer routers generally do not.
Also Check Security Settings
While you’re optimizing network speed settings, it’s also a good opportunity to review your security configurations:
-
Change Admin Password: Update the default password to a strong, complex one.
-
Wi-Fi Encryption: Set your Wi-Fi to WPA3 or, at minimum, WPA2.
-
Disable Remote Management: If you don’t need to access the admin page from outside your network, disable this feature.
-
Automatic Firmware Updates: Enable automatic updates to ensure you always have the latest security patches.
In Closing
Optimizing your Olleh router’s port link settings can significantly boost your network performance. By setting your ports to Full Duplex mode and applying appropriate Pause settings, you can improve stability during large file transfers and enhance your overall internet experience.
We encourage you to follow the steps outlined in this guide to find the most suitable configuration for your network environment. Always remember to record your current settings before making any changes, so you can easily revert if any problems arise.
Network configuration, once optimized, can provide long-term stable usage, making the time invested in proper setup well worth it. We hope this article helps you improve your network environment!
새 글 알림 받기
AI, 가젯, 소프트웨어의 최신 트렌드를
이메일로 가장 먼저 만나보세요. 무료입니다!